

Why update SPFx?
When you develop new SPFx projects, you probably always use the latest version of the SharePoint Framework. That way, you are always up to date with the latest features the framework has to offer at the time.
But what about projects developed months or more ago? These are not automatically up to date because the development environment is updated. And it often happens that one or more changes need to be made to an older project. Think here for example of a bug that needs to be fixed, a change to a functionality or even adding a functionality.
Even when not bug fixes or adding/editing features, it can be very useful and important to update the project. New versions often include performance and stability improvements.
To update a project to the latest SPFx version, you have two options:
- Reconfigure the development environment to the SPFx version used at the time the project was initially developed.
- Update the project where changes need to be made to the latest version of the SharePoint Framework
Since it would take a lot of work and time to adapt the development environment to a project each time, this option already does not seem to be the best one anyway. On top of that, you have several advantages when you update a project to the latest SPFx version:
- Bug fixes in the framework itself
- New functionalities and features
- Improved performance and stability of the framework itself
- …
How to update.
Updating an existing project to the latest version of the SharePoint Framework can be done in several ways.
You can start doing this completely on your own. So what does this mean? Manually remove and install necessary packages, modify configuration files, make sure the dependencies between packages are completely correct. As you can infer for yourself, this does take some work and leaves a lot of room for error (and accompanying frustration).
Enter…CLI for Microsoft 365!
CLI for M365!
This is a cross-platform (any OS) command line interface (CLI) that allows managing several configuration settings for M365 and SharePoint Framework projects.
To upgrade the project, we use the following command:
spfx project upgrade
Thanks to this command, updating becomes a whole lot easier.
Important: The command is not going to upgrade the project itself or modify files. A report is generated that serves as a guide to perform the necessary steps to apply the upgrade to the project.
Roadmap
Below are the main steps to be taken:
- Install CLI for M365
- Project cloning/unpacking
- CLI command run
- Follow steps from the report
- (dev)Dependencies check in package.json
- node_modules / package-lock.json
Install CLI for M365
Open Visual Studio Code and run the following command in the terminal to globally install the CLI for M365:
npm i -g @pnp/cli-microsoft365
Project cloning/unpacking
If your project is on GitHub, you can download the project as a zip and extract it to a desired location. Or from Azure DevOps, you can also clone the project locally to the desired location on your PC.
CLI command run
Open Visual Studio Code and open the folder where the project is located. Then run the following command:
m365 spfx project upgrade -o md > upgrade.md
The command will run and generate a report in Markdown format. This describes all the steps required to bring the project to the latest SPFx version. In this case, the report is named “upgrade.md” and is located in the root of the project.
Follow steps from the report
Right-click on the file and select Open Preview (first menu item). In the report, you will see pieces as shown in the screenshot below.
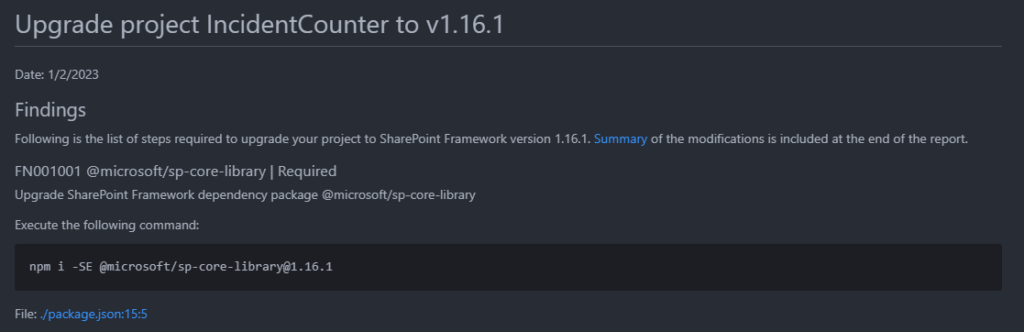
It describes which library/package should be updated, whether or not it is a mandatory step as well as the command itself that should be used to update the library/package in question. To do this manually for all libraries and packages would also take a lot of time, but there is good news.
Below this step-by-step section there is a section with a summary trap all the commands to be executed. You can copy and paste this bit into the terminal and run it all at once. This piece looks as follows:
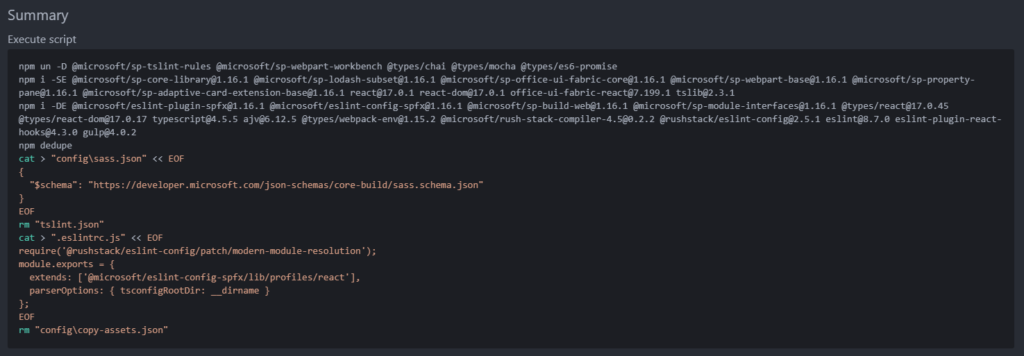
Note that below the npm commands is a piece of bash code. If you’re on Windows, make sure Windows is configured to run this. If this is not possible, you can do the steps from the script manually.
The script explained
| Script | Explanation |
| npm un -D <packages> | Removes the packages and also removes them from devDependencies. |
| npm i -SE <packages> | Installs the packages and adds them to the dependencies. |
| npm i -DE <packages> | Installs the packages and adds them to the devDependencies. |
| npm dedupe | Simplifies the package tree structure by putting dependencies higher in the hierarchy. |
| cat > “configsass.json” << EOF { “$schema”: “https://developer.microsoft.com/json-schemas/core-build/sass.schema.json” } EOF | Creates a file ‘sass.json’ in the ‘config’ folder. The piece of code after EOF and before the last EOF is written to the file. |
| rm “tslint.json” | Deletes the file ‘tslinst.json’ from the project. |
| cat > “.eslintrc.js” << EOF require(‘@rushstack/eslint-config/patch/modern-module-resolution’); module.exports = { extends: [‘@microsoft/eslint-config-spfx/lib/profiles/react’], parserOptions: { tsconfigRootDir: __dirname } } }; EOF | Creates a file ‘.eslintrc.js’ in the root of the project. The piece of code after EOF and before the last EOF is written to the file. |
| rm “configcopy-assets.json” | Removes the file ‘copy-assets.json’ from the ‘config’ folder. |
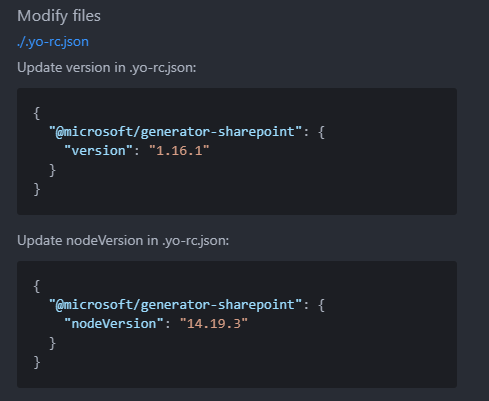
After all this is done, you will see in the report a few more steps to be performed. These are modifications of configuration in existing files and they look as follows:
(dev)Dependencies check in package.json
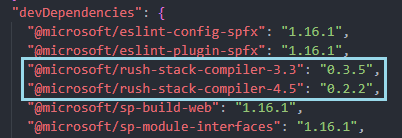
Although they are strictly different packages, make sure there are no duplicate dependencies present in the package.json file. This is to avoid mistakes. Example:
node_modules / package-lock.json
To make sure that no old versions of packages stick around, delete both the node_modules folder and the package-lock.json file. After this is done, run the following command to install all the necessary modules:
npm install
Everything has been reinstalled and you can now run gulp serve to test if everything works as before.
Decision
There’s no one-click way to update an SPFx project to the latest version, and while it’s a fair number of steps, the CLI for M365 has made it a whole lot clearer and easier!
